Chorizo Empanadillas – hot little pockets of love…

Tags

, , , , , ,

I just love little stuffed things.  Every culture has a little stuffed bit of dough, filled with a little bit of seasoned meat and veggies that is always something truly amazing when you get to eat it.  I hope that everyone on the whole planet has at least one food memory of sinking their teeth into a hot little pocket of love, whether it’s their favorite aunt’s samosas, or grandmas dumplings or their dad’s holiday peirogi.  When I think about all the wonderful things that my family made on special occasions, it’s always my Dad’s Chinese pot-stickers and my Grandma’s inari sushi.  Also, I’m so thankful to the wonderful cooking teachers I’ve had that have shared their recipes and traditions with me along the way. 

When I have days off, I like to try to take some time to make something nice for the hubby and I to have for dinner.  What truer expression of love is there than choosing to spend your time to make an extra special meal for an extra special someone?  I let him think that it’s all for him and that I’m simply an amazing wife, but the truth is that I like tasty little treats from time to time too!  🙂  

Letting my stockpile in my chest freezer guide my meal planning, I had some chorizo that I wanted to use up.  A little toodling around online lead me to the idea for making some empanadillas with it and here’s what I came up with.  Hope you like it!


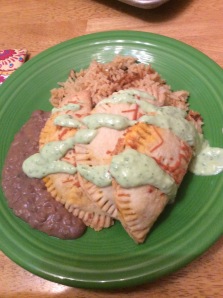
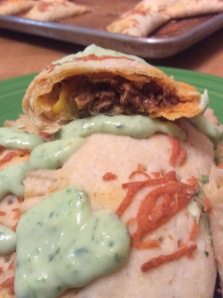
Chorizo Empanadillas – served with rice and refried beans and avocado sauce

Serves 4-6 – cost approx $1.50 per serving, including sides

Makes approx 17 empanadas – cost approx $4.50 per batch

***Just a little side note here.  This was my first go at this recipe and there was about 1/3 cup left over filling.  If I were doing this over, I would increase my dough recipe by about 50% to use up all the filling.  Or you could use it for something else, like a breakfast burrito, some pupusas, put it over some rice for a nice little lunch…***

Ingredients

  • 1/2 lb Mexican chorizo ($1)
  • 1 onion, small dice ($.33)
  • 1/2 bell pepper, whatever color you like best ($.25)
  • 1 jalapeno pepper, minced, optional ($.25)
  • 1/2 cup corn kernels – fresh or frozen, use whatever you have around ($.25)
  • garlic salt, to taste
  • 2 green onions, minced ($.18)
  • 1 cup/4 oz shredded mild cheese – any type of mild cheddar, jack or pepper jack would be nice.  I used a ‘Mexican Cheese Blend’ that I got on sale ($.63)
  • 2 cups all purpose flour ($.22)
  • 1/2 cup masa harina or corn flour ($.08)
  • 1 stick/ 4 oz butter, cold, cubed ($.62)
  • 4 oz lard, cold, cubed – you could use shortening if lard creeps you out… ($.43)
  • 1 tsp salt

Preheat the oven to 350F.

Start by browning the chorizo over medium heat in a saute pan.  When some of the fat starts to render out, add in the onion, bell pepper and jalapeno.  Saute for 5 minutes.  Add in the corn and green onions.  Add garlic salt to taste.  That’s all there is to the filling!

For the dough, make it however you like to make your pie dough.  I did the food processor ‘dump everything in’ method.  Just pulse until the flour and fats have come together then drizzle in cold water until it just comes together.  Give the dough (literally) one or two kneads so that it comes together.  Keep in the fridge until you’re ready to use it.  

Roll out the dough on a floured surface.  I went pretty thin, inbetween 1/8″ and 1/4″.  Cut out circles about 4″-6″ in diameter.  You can use a large mug or a small bowl (or a large biscuit or cookie cutter would be the best tool, but I don’t have one…) to trace out the circles.  Fill with a heaping tablespoon of chorizo filling and a good pinch of cheese.  Fold over and crimp the edges with a fork.   Poke some vent holes in the tops with a fork.  I sprinkled a little bit of leftover cheese on the top, just to be all decadent and stuff.  (Here is where you could freeze them for later if you wanted.)


Bake at 350 F for 30-45 minutes or until hot, golden and delicious.  


Sriracha Honey Lime Glazed Shrimp – Easy money…

I’m not feeling particularly chatty today, so I’ll just get to it.  Last week was pretty crazy for me and I really needed something quick and easy to put on the table at the end of the day and this spicy, Asian-flavored glaze really fit the bill.  I made up a larger batch earlier in the week and basted it over some broiled salmon (yum!) and then used the rest of it to make some sauteed shrimp for a noodle bowl.  I really liked how this dinner was warm and satisfying but full of exciting flavors, all for a truly minimal effort on my part.  I think I’ll put this one in the win column.


I imagine that this marinade/glaze combo would be good on any sort of white meat!  Like little chicken or pork satays, even whatever white fish is on sale; I can tell you that it was awesome on both salmon and shrimp.  Hell, this zesty-ass stuff might even make tofu taste pretty good…

Sriracha Honey Lime Glaze – also good for a marinade

Makes approx 1 cup – cost approx $.91 per batch (I got two meals out of one cup of this marinade)

  • 1/4 cup honey ($.33)
  • 1/4 cup Sriracha sauce ($.23)
  • 1/4 cup soy sauce ($.10)
  • juice of one lime ($.25)

Shrimp Noodle Bowls 

Serves 4 – cost approx $1.49 per serving

  • 1/2 lb shrimp – peeled and deveined ($2.50 – I got a good deal and stocked up!)
  • 1/2 cup Sriracha Honey Lime Glaze ($.46)
  • 1 large package glass noodles – they’re sometimes called vermicelli noodles or mung bean noodles, I think.  The little clear bundles that soften up when you pour hot water over them.  I boiled my shrimp shells and poured the shrimpy water over my noodles for a little extra flavor.  ($1.50)
  • Shredded vegetables – I used cabbage, carrots and bell pepper because it’s winter and that’s all I had.  Cucumber, sprouts, or ice berg lettuce would all be good summer time additions! Hey, if you’re truly short on time, a package of un-dressed coleslaw would work here too.  ($1)
  • Herbs – I used cilantro and mint.  ($.25)
  • 1/4 cup toasted, chopped nuts – peanuts or cashews would be tasty, I used the peanuts ($0, my fireman brings me home some of his snacks from fire camp in the summers…)

Fixin’s!

I started by putting my shrimp in the marinade first so that they could soak up some flavor while I prepped all the other ingredients.  Then, I just sauteed them, marinade and all, which makes a nice little sauce to drip into the noodle bowls.  Start with some noodles in your bowl then add whatever veggies you like and top with the shrimp and some toasted nuts!  Easy money.   

Southwest Chicken and Black Bean Taquitos – the revenge of the Taquito craze…

Tags

, , , , , , , , ,

I was pretty happy with all those taquitos I made this winter, I thought they were great.  Now I know they could be even better…


My moment of clarity came last week at work when we found ourselves with several pounds of leftover chicken salad from a banquet.  In stepped super-hero, Sous-Chef Ceasar (he’s a man of many titles) who said ‘lets make flautas.’  He added some of his special brand of love to that chicken salad (meaning beans, cheese and spices, get your mind out of the gutter), rolled it up into corn tortillas and took it for a dip in the deep fryer.  It was topped with some guacamole and cotija cheese and thus a beautiful appetizer special was born.  It sold like hot cakes all weekend.  

Now these little suckers were what flauta/taquito dreams were made of.  Perfectly crispy yet creamy, a veritable flavor explosion.  I think that the secret was that mayonnaise in the original chicken salad.  I decided in that moment when the first fauta, fresh out of the deep fryer, hit my lips that I needed to try to make these little suckers at home.

So creamy…

But before we get down and dirty, a little linguistic digression.  Latley, I’ve been working on improving my Spanish by asking my Latino co-workers clarification on words I wasn’t sure on and adding a few new bits of vocabulary here and there.  (Yesterday I learned that ‘chichis’ are nipples where as ‘tetas’ are boobies but ‘pechugas’ are what chickens have…)  So, I asked one of my coleagues what the differerence between taquitos and flautas was.  He said “Flautas come out of a deep fryer and taquitos come out of a microwave.”  Interesting.  Seeing as what I make at home are no where near authentic Mexican food, and I’m not busting out my deep fryer today, I’m going to keep on calling them taquitos.  

Southwest Chicken and Black Bean Taquitos – served with Spanish rice, slaw, lime sour cream and avocado sauce

Serves 5 – 6 – cost approx $1.26 per serving, including sides and sauces

Makes approx 40 taquitos – Batch costs $4.45 or $.11 per taquito

Ingredients

  • 2 cups cooked black beans – from 1 cup dry beans ($.40)
  • 2 cups shredded cooked chicken – a great use for leftovers ($.43 I got a whole chicken for $.60/lb because it was the sell by date, if you can be flexible in your menu planning or have room in the freezer you can take advantage of those killer deals!)
  • 1 jalapeno, small dice ($.25)
  • 1/2 red bell pepper, small dice ($.25)
  • 1/2 onion, small dice ($.06)
  • 2 cups/ 8oz shredded mild white cheese – jack, mozzarella, or white cheddar would be good ($1.20)
  • 1-2 Tbs ground cumin, to taste
  • salt, to taste
  • 1/2 cup mayonnaise ($.50)
  • 40 corn tortillas ($1.11)

Just mix up all the ingredients in the first set to make the filling.  


What happy colors! Maybe I’ll add some corn next time…


Follow the procedure outlined in my first taquito post (https://fullbellyfullwallet.wordpress.com/2014/10/30/pulled-pork-taquitos-im-falling-fast/) to roll up the little suckers.  From this point you can either freeze them for later use or bake them right away.  When you want to eat, cook at 400F for 20-25 minutes or until golden brown.  Serve with any sauces that you like and dig in!  These would be a great appetizer or could be a full meal when paired with some rice and veggies.

Feta Stuffed Chicken Breasts and Thighs – onward MacDuff!

Tags

, , , , , , , , , , , ,

In my efforts to actually use the all the things I have stockpiled in my chest freezers, I’m trying to use up that feta cheese I got such a good deal on a few months ago.  Aside from it’s appearance as a dip, that feta is having a cameo in some stuffed chicken tonight.  This isn’t the most original recipe, but if it ain’t broke…

 Stuffed meat seems to be disproportionately more impressive than it is hard to make.  It takes a bit of time, but it’s not too challenging and is a great make-ahead dish for when you need a show-stopping entrée.

***And now for something completely different.***

 So, I need your help on difference of opinion that I had with my fireman.  He was helping me cook my rice pilaf, (just a simple one of sauteed onion, rice and a bay leaf) and after it had come up to a boil and been covered, I caught him opening it up and stirring it and I just freaked out in a matter entirely inappropriate for matters of rice cookery.  My reaction was more suited to a situation like finding a kid feeding your dog chocolate bars…

Now, I have a difficult history with ‘white people rice.’  Coming from an Asian household I had only learned how to do rice using a rice cooker.  When I was in culinary school, I learned that once you bring the rice up to a boil in rice pilaf you cover it and let it ride over low heat without ever touching it or opening the lid or stirring it.  Since this seemed to work for me, I have held up this method as gospel.  My fireman says his Mom taught him to stir it occaisonally.  I have no doubt that both methods will result in rice that is fully cooked, and any differences would be that of personal taste and final texture; and the rice was certainly not ruined like my reaction might have indicated.  Infact, it was equally as tasty and fluffy as it usually it.  My whole world is shattered.  What do you do in your house?

On with the show.


Feta Suffed Chicken

Served with Roasted Beets ($1) and Rice Pilaf ($.67)

Serves 4 – cost approx $1.28 per serving, including rice and beets!

Ingredients

  • 1/2 onion, small dice, sauteed ($.11)
  • 2 cloves minced garlic
  • 2 Tbs minced parsley
  • 1/2 tsp dry oregano
  • 1/2 cup bread crumbs ($0 if home made from stale bread)
  • 1 lemon’s zest ($.15)
  • 1 egg ($.28)
  • 5 oz/1 small package/1 scant cup feta cheese ($.48)
  • salt and black pepper to taste
  • 4 chicken pieces to be stuffed – could be breasts or leg pieces that have been de-boned ($2.18)

Start off by making the filling.  When I cooked up some rice pilaf to go with dinner I just sauteed one onion and took out half for my stuffing and kept half in the pot for the rice.  If that’s not what you’ve got planned for dinner, saute up that onion half.  Then mix all the ingredients in the first set.


For stuffing chicken breasts (or pork chops or any solid piece of meat for that matter) you can just hollow out a pocket in the meat with a long, thin knife that runs the whole length of the breast.  Then pack in the stuffing through your initial incision.  I’m always amazed how much stuffing a chicken breast can hold!  And for thighs, I just remove the bone and pound out the meat a little bit so that it’s an even layer of chicken and then roll it up with a handful of filling inside and secure it with toothpicks.   I stuffed all my chicken pieces really full, but with the ammount of filling I had, I could have easily suffed twice as many chicken pieces.  But hey, go big or go home, right?

Preheat the oven to 375 F.  Heat up a oven-safe pan over medium heat with some olive or vegetable oil in it.  Sear the skin side of the chicken, 3-5 minutes.  Flip over your pieces gently and then toss in the oven for 30 minutes or until completely cooked through.  (Which is 165 F for any stuffed meats, according to The Man, to make sure any salmonella that infiltrated the stuffing is fully dead)  You can toss in some small to medium diced veggies too to cook with the chicken!  I had some beets that joined the party…

Lamb and Mushroom Shepherd’s Pie – On thrifty splurges…

Tags

, , , , , , ,

Perfect for a chilly day

Perfect for a chilly day.

Just because you’re trying to save money at the grocery store, doesn’t mean that you have to live on just rice and beans your whole life. Every now and then you have to treat yourself to a little something-something.

If there’s a good deal on a more ‘luxury’ ingredient, snatch it up and make yourself something nice! I found a good deal on ground lamb for just $3.98 per lb as it approached it’s ‘sell-by’ date and I’m going to turn it into two yummy meals. It seems like my fireman was on the same page as me, because when he took a trip down the hill and visited a farmer’s market with his folks he found a good price on some nice cremini mushrooms. With some extra mashed potatoes leftover in the fridge, that seemed like the perfect storm for a nice shepherd’s pie.

What a pretty bag of funghi!

What a pretty bag of funghi!

When you think about it, so many of our most beloved dishes were made to stretch out a little bit of something expensive or fancy.  Savory pies, every sort of dumpling under the sun, most soups, stuffed pastas, satays…  Just like every thrifty person since the dawn of time has figured out, if you can pick a dish that economically utilizes a more expensive ingredient, you can get a better bang for your buck.

This dish costs more than my usual dinner-fare, but I think it’s a really great value for the high quality ingredients. A splurge on fancy ingredients doesn’t hit so hard when you know you got a good deal; I think it makes it taste even better.

Lamb and Mushroom Shepherd’s Pie

Serves 2 – 4 – cost approx $2.20 per serving

Ingredients

  • 1/2 lb gr lamb ($1.99)
  • 2 cups cremini mushrooms, caps quartered and stems small dice ($2.50)
  • 1 onion, small dice ($.25)
  • 2 carrots, small dice ($.18)
  • 2 ribs celery, small dice ($.10)
  • 4 Tbs/ 1/2 stick butter ($.37)
  • 1/2 tsp dry thyme
  • 2 Tbs tomato paste ($.05)
  • 2 Tbs flour
  • 1/2 cup red wine ($.15)
  • 2 Tbs Worcestershire sauce
  • 1 cup stock – doesn’t matter, vegetable or meat stock will be just fine
  • 2 Tbs minced parsley (optional)
  • 4 cups leftover mashed potatoes ($.75)
  • 2 Tbs parmesan cheese

Preheat the oven to 350 F.  In an oven safe large pan or pot brown the lamb, seasoning with salt and pepper. Remove meat, leaving the fat in the pan. Sear caps, over medium high heat and season with salt and pepper 8-10 min. Trust me! Get them nice and brown, only stir it a few times to get them happy and browned up.

Reduce the heat to medium and add in the butter, minced onion, carrot, celery, and mushroom stems and then sauté 5 minutes. Return the meat to the pan and cook 5 minutes more. Add the tomato paste and flour, cook 3 minutes.  Add in the wine, Worcestershire sauce and cook 2 minutes, then add in the stock. Simmer for 10 minutes. Taste to check the seasonings and add salt or black pepper if needed. Finish the lamb stew with the parsley.

Saucy goodness

Saucy goodness

Top with the mashed potatoes and sprinkle with the parmesan cheese. Bake at 350 F for 15 minutes or until the top is golden brown.

Creamy Feta Dip – another product of my Pinterest addiction…

Tags

, , , , , , , , , ,


image

Creamy feta spread on spicy falafel? Yes, please!


When life gives you a lemons, make limoncello.  (Or lemonade if you’re boring, whatever.)  Keeping that in mind, when the gods of the grocery bargains present you with a great deal, you have to snatch it up and make something delicious with it.  Something that I got a great deal on recently was some crumbled herb feta for just $1.40 per pound.  The catch? It was in a five pound bag.  So, out came my trusty food sealer and I portioned, labeled, and popped it in to the freezer.  In my experience, cream cheese, shredded cheese and crumbled firm cheeses freeze pretty well.

Lately, my fireman has been giving me grief about having (and filling up) two chest freezers.* In my efforts to reduce the contents of the freezers, I realized that I should make more of an effort to use that feta.  I was brainstorming on Pinterest and came across several recipes for feta dip.  Then I was off to the races.

*Note: on chest freezers.  I don’t want you to think that we have anything against chest freezers; in fact, I have found having a chest freezer to be a great help in keeping a grocery budget.  When you get a windfall or an amazing bargain, it really helps to have a place to keep it.  My first chest freezer is probably the most used/useful wedding gift that we got, and I was quite excited when my Dad said he didn’t have space for his one any more.  My fireman’s thought (which I totally agree with) is that if I can get everything into one freezer we can un-plug the second one and save on our energy bills.  Then, when someone in the family bags a deer or has an epic fishing trip we can plug #2 back in!*

I used my yummy feta dip in a kind of Greek-themed mezze platter dinner with flat bread, spicy falafel and tzaziki sauce.  The fireman dubbed this dinner ‘a keeper.’  This dip/spread would be wonderful in any sort of sandwich or wrap or as part of an appetizer spread with garlic toasts or pita chips.  I had half of it left over and I think I’m going to add it to some scalloped potatoes or something…

image

Creamy Feta Dip

Makes 2 cups and serves 4-6 – cost approx $1.86 per batch or $.37 per serving

Ingredients

  • 4 oz cream cheese ($.12 – yet another great deal I have stashed up in the freezer)
  • 8 oz feta ($.70)
  • 2 Tbs minced parsley – any sort of herb that you like would be great
  • 1/2 lemon’s juice ($.20)
  • 1/4 cup olive oil ($.59)
  • salt & black pepper – to taste, be sure to taste first, feta can be salty and depending on the brand you get you may note even need the salt

Pay attention now, because this one is really tricky.  Put everything in a food processor and blend it up.  Taste and adjust for seasonings.  If you like pepper, maybe garnish it with a little more fresh cracked pepper…

image

Deep Frying 102 – The beer battering

Tags

, , , , , , ,

This is the final installment of ‘what happened to that first batch of oil in my new deep fryer.’  So far, I’ve made zucchini sticks, deep fried mac’n’cheese, some buffalo wings, and a batch of doughnuts.  Not too shabby.  After each day that I used the fryer, I strained that crud and lost little bits out of the oil and cleaned the fryer before returning the oil.  When I was done, I kept the fryer bucket covered and in the fridge.  (Any cool and dark place will do just fine though.) Cleaning everything out in between uses and storing it properly will make your oil last much longer.

The last things to be fried before the oil flew up to the great dump in the sky were some chili rellenos and fish and chips, both of which were beer battered.

Let me take a minute here to say that the fish was the last thing to be fried and also the last thing to be dipped in the beer batter before both the oil and batter were thrown out.  The batter because of the fear of germs and the oil because fish makes it smell funky.  Doughnuts with a hint of halibut?  No thank you.

To beer batter something, you just toss it gently in seasoned flour (just like Three Stage Frying!) and then dunk it into the beer batter.  Batter has a hard time sticking to moist items, like stuffed chilis or fish pieces, and the flour helps the batter stick to the ingredient to be fried.

image

These were just some roasted pasilla chilis that were stuffed with cheese, hot peppers, onions and corn.  A happy little vegetarian dinner.  Sorry, no recipe it was some windfall ingredients that I had a while back and popped into the freezer a month ago and I have no clue what it cost to make it.  Don’t be ashamed of your thrifty-ness and and creative ability; if your friends know about it, they will start giving you things they’re not clever enough to use up or don’t have the time for.

image

Here’s my fish and chips, made from some halibut that my Daddy slew up in Alaska.  Any white fish that you like would be great.  I did oven fries because shit was just getting a little to real around here with the new deep fryer.

Basic Beer Batter

Makes 3 cups, which is enought to fry quite a few things – cost approx $1.24 per batch

Ingredients

  • 1 egg ($.16)
  • 1 can cheap beer ($.58, yep I know, really cheap beer)
  • 1 1/2 cups flour ($.25)
  • 1 Tbs lemon juice
  • Pinch salt

Just mix everything together until it’s almost lump free.  I like to store my batter in a tall, slim container so that I can get maximum dunkage and minimal waste.

This beer batter will keep in the fridge for a day or so, I wouldn’t push it more that 2 days though.

Doughnuts! – I <3 my fryer

Tags

, , , , , , , ,

image

All Hail the might one: James Beard!  I whipped up a batch of doughnuts using the recipe from his “Beard on Bread” book. (A book that I stole from my father, so sorry, sorry that I’m not sorry.)  If you’re looking for a starting point for any dish, after asking your Grandma, next look for recipes from people named Beard, Child or Waters, (listed alphabetically, not in order of preference.) I’ve yet to be disappointed.  Mr. Beard’s doughnuts were no exception.

This is less of a recipe and more of a sales pitch for in-home deep fryers, jeez I love having one.  This was my first go at doughnuts, thank goodness I had my fireman to help!

imageWe just rolled out the dough and cut it into squares (only because I don’t have any circle cutters…) then dropped it into the fryer.  They aren’t a really pretty shape, but who need looks when you taste so damn good?

A fireman approved afternoon snack!

A fireman approved afternoon snack!

Some were stuffed with pastry cream and topped with Nutella, the nectar of the gods.  The rest were stuffed with apple butter and topped with powdered sugar, you know, to be healthy.

image


Deep frying 101 – so deep…

Tags

, , , , , , ,

Hey there friends!  I got a deep fryer!!!  I’m so excited, I used a gift card from Christmas to get myself a “Grand Pappy – Fry Daddy” model deep fryer.  It’s essentially a non-stick bucket with heating element. My Dad has the regular size version and I always liked it, and I’m quite enamored with it’s big brother.  It’s really not all that big, it only takes about 6 cups of oil (which only cost me $2.85!) and you can use the oil multiple times if you strain it out in between uses and store it somewhere cool.  I’m planning on showing you everything I get out of one batch of oil.

IMG_0084-0

My new toy!

Alright class, so today’s topic is Three Stage Frying. This is the basic technique for cutlets of meat, veggies and a variety of other happy, fried goods! Maybe even something for the SuperBowl tomorrow? Today I ‘Three Stage Fried’ both balls of leftover mac’n’cheese and zucchini sticks, and they were glorious.  Sorry, no prices today as I am frying up mostly leftovers and bits of things in the fridge that needed to be used up.  I’d be willing to bet that it’s all a lot cheaper than ordering this stuff at a restaurant though!

Plus  made some buffalo wings, but those aren't Three Stage Fried...

Plus made some buffalo wings, but those aren’t Three Stage Fried…


The Three Stages are as follows: #1) Seasoned flour #2) egg and milk bath #3) bread crumbs. You just gently coat your goodies in each of these things in turn, shaking off any excess, and then you drop them into hot oil. Then the magic will happen. The key to the magic is having everything prepped out and ready.

Phase one of being prepared is what I like to think of as ‘software’ or ingredients.  First off, prepare all your base ingredients that are going to be fried.

image

Second, get your ‘Three Stages’ ready.  It’s a good idea to use bigger bowls than you think you’ll need.  I quickly realized the error of using that tiny bowl for bread crumbs in the picture below and switched to something bigger.  Just to repeat, first flour seasoned with a little salt and pepper, whole eggs and milk whisked up together, and breadcrumbs.

imagePhase 2 is your ‘hardware’ or equipment.  Aside from the fryer (or pot of hot oil) itself you will need a landing spot for your fried goods to drain.  I like the traditional cooling rack over newspaper set-up.  Turn the cooling rack over so that it touches the newspaper to get maximum grease drainage.

image

You’ll want a tool for fetching things out of the hot oil.  You’ll want to avoid cheap plastic tools.  Tongs or a slotted spoon work best for me; wooden chopsticks are good too if you’re a confident chopstick weilder!  (I got laughed at by an older, hispanic, co-worker for using chopsticks to fish things out of the fryer at work today.)  It’s nice to have a pinch-pot of salt around too for seasoning your food hot out of the oil.

Lastly, and optionally, I like to have my serving plates in a warm oven. ready to hot-hold my fried treasures.  200F is good in my experience.

imageNow you’re ready to experiment in the laboratory of your kitchen!  Deep fry away!  How did your creations turn out?  Mine were pretty tasty.  My fireman is pretty stoked that we got this awesome deep fryer…


Butterscotch Souffle with an Accidental Creme Anglaise

Tags

, , , , ,

image

One might ask, what is ‘Accidental Creme Anglaise?’  Well, when one’s loving and almost-perfect husband puts a container of home made vanilla bean ice cream in the refrigerator instead of the freezer, one has an accidental creme anglaise on their hands.  I noticed it the next morning, and when I asked the husband in question, he thought that I did it.  His suggested solution was just to drink it and my first thought was to spin it up in the ice cream maker again.  We both agreed that making additional desserts was the best option for everyone involved.

Every time I make soufflés, I wonder why I don’t make them more often.  The techniques are simple, the ingredients are common and inexpensive, they can be prepped ahead and it’s impressive as hell!  Go ahead, impress your loved ones with a soufflé dessert…

Butterscotch Souffles 

Makes 7 small soufflés – cost approx $.25 each

Ingredients

  • 1 1/2 oz butter, room temperature ($.28)
  • 1 1/2 oz flour ($.03)
  • 3 oz sugar, divided ($.12)
  • 1 cup milk ($.19)
  • 4 eggs, separated ($.50)
  • 4 oz butterscotch chips ($.66)
  • 1 tsp vanilla extract

Now preheat your oven to 375 F and butter and sugar 6 1/2 cup ramekins or creme brulee cups. (Or you could make one big souffle too!)

imageIn a small bowl mash the flour and butter together to form a smooth paste. (In fancy French terms, this is called a beure manie.) Set aside for later.

In a small pot, heat the milk, 2 oz of sugar and the butterscotch chips and bring to a gentle boil. Turn the heat down to very low and whisk in the flour and butter paste until it’s smooth and the mixture is thickened. Remove from the heat. Whisk in the egg yolks, one at a time and then the vanilla. Set aside for later.

Whip the egg whites to soft peaks and then add in the remaining 1 oz of sugar. Continue whipping the egg whites until you have stiff peaks. Gently fold the egg whites into the butterscotch base mixture you set aside earlier.

Pour the mixture into the prepared souffle cups and either refrigerate for later or bake your souffles.

Unbaked souffles will keep for 1-3 days covered in some plastic in the fridge.

Unbaked souffles will keep for 1-3 days covered in some plastic in the fridge.

Smaller, 1/2 cup, sizes will cook in 15-20 minutes or larger souffles will take longer.

Serve as is, or with whatever sort of sauce you may have around, accidental or otherwise.